A lifetime project: Tjodheim
a story on refurbishing an old house
Tjodheim

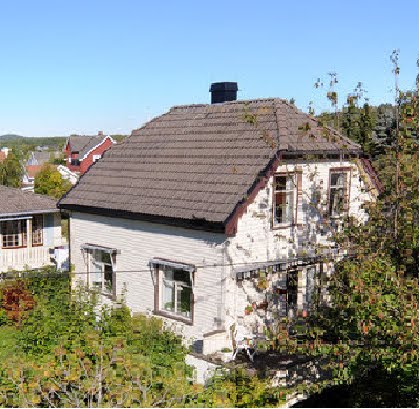
The story of this house says that it was built in 1917 and it was an apple and plum orchard. Records show payment of property tax til 1923. I have tried to find information in between but have not been successful. In 1971 this couple bought the house, which was, by then, divided into 2 apartments, one above and one below with a shared bathroom. By 1979, the couple sold it to a widower with 6 kids, who then turned it into a single unit house again.
Saturday, September 17, 2022
My advent calendar
I thought about buying one of those silly cardboard-ready-made advent calendars that will only reveal a chocolate behind each little door representing a day closer to the birth of Jesus Christ. That´s how I remembered my childhood advent calendars. But then I realize that a child is a child only once and as every year passes, her memories will be different each time. So why not make something different out of it? Take advantage of the Christmas season to have a little bit of fun and give our imagination a bit of a boost. This is what the calendar ended up looking like:


Wednesday, July 11, 2018
My newest Project
The Kitchen!
The old kitchen was just unbearable so I had to do something about it. Before moving in, I made sure that all the floors were in place, I guess one can live without a dream kitchen for a few months or even a year!This is the dining area. Notice the carpet.
Oh, and the green color on the walls!
This is the kitchen, next to the dining area but there is no carpet, instead there is some cheap vinyl that simulates wood panels. And the furniture is some real vintage 1950's stuff. Very little space and countertops made of some formica that was all cracked up.
There was also an antique fireplace next to the kitchen but it had not been in use for many, many years because of the problem with the chimney needing to be rehabilitated. It is a pretty compact kitchen.
The plan is to remove the wall on the side where the fireplace is, the left. Once that wall is knocked down then it can connect to the living room, giving me more space to see Isabelle when she is up to mischief. :)
This is it, wall knocked down, kitchen in state of chaos and once you get started, you can only keep moving forward.
Wednesday, December 23, 2015
Retaking
So... 2018 is the year the project restarts after a major setback due to a terrible, terrible man who posed as a carpenter and stole my money. :(
Sunday, December 23, 2012
Flowers in the Garden
 |
| Tulips are so rich in color! |
Master Bedroom
I have so many ideas for my masterbedroom! One of them is to remove the nasty carpeting there is right now and bring out the life in those 1917 wooden boards on the floor. If the woodboards are un rescuable, then one can always recurr to the magic of white lacquering. It is to my understanding that painted wood is colder than oiled wood so I am keeping my fingers crossed so I can do my reviving of the woodboards with oil. The walls would definitely be repainted in either a very light ivory or off
 white color.
 I have also thought about putting in a set of sliding doors to make a closet, but then again I can't really make up my mind because of the slanted roof. In my current home I went through the trouble of custom making a closet and gosh was it one big piece of work!
The other idea would be to have some sort of chest drawers of about a meter high from the start of the slanted roof up to where the window is but then the space from the top of the chest of drawers would be wasted...
Something like this perhaps, from our good friends of IKEA...
Jeg har så mange ideer for masterbedroom min! En av dem er å fjerne den ekle teppe som står der akkurat nå og få ut det liv i de 1917 trebord på gulvet. Hvis planker er ikke brukelig, da kan man man alltid gjør den magiske hvit lakkering. Det er til min forstand at malt trevirke er kaldere enn oljet treverk, så jeg holder fingrene krysset slik at jeg kan gjøre mitt gjenopplive av planker med olje. Veggene ville definitivt males i enten en svært lys elfenben eller egg hvit.
Jeg har også tenkt på å sette i et sett med skyvedører å lage et skap, men da igjen jeg kan egentlig ikke bestemme meg på grunn av skrå taket. I min nåværende hjem gikk jeg gjennom bryet med å lage egendefinerte et skap, og gosh var det en stort stykke arbeid!
Den andre idé ville være å ha en slags kommode skuffer på rundt en meter høy fra starten av skrå taket opp til der vinduet er, men da plass fra toppen av kommoden ville være bortkastet ...
Noe som dette kanskje, fra våre gode venner av IKEA ...
The fireplace!
From Parafin to Wood
The house had a parafin oven fitted in the year 1973 and it was used up until the house was sold in 2010. Now, coming from the tropics where fireplaces are only meant to look like a fancy decoration in a living room, I had no clue of how necessary it would be to have a working one in the house. Needless to say, I found out that parafin is not very user-friendly. I hate the smell and I am terrified of the fumes and everything related to parafin.Major decision:
Remove the parafin oven and replace with a real fireplace. (check!)
Replace with a real fireplace. At a cost. A rather high cost!
So I contact the municipality and I find out that the chimney needs to be rehabilitated before installing a fireplace. I call the heat people and they come over and give me a quote. The damage?
10,000USD, yep, ten grand. That is around 60,000 Norwegian Kroner. The job they have to do is basically get on the roof and insert a new steel pipe down the chimney in order to avoid any possible fires. the house is almost 100 years old so it is imperative to do it. (after much consideration: check)
Here is the old parafin oven (really 1970's!)
A piece of art isn't it?
This is how it looked when I bought the house.
Now choosing a fireplace is not an easy task. Goodness it is one of the most difficult journeys I have embarked myself on! So I learned as much as I could about fireplaces, the pros and the cons, the beautiful ones, the practical ones, etc. And in the end I went for the Nordpeis, especially tailored to Nordic interiors.
It is pretty heavy but it delivers. Though it takes a good five hours before the whole house is warm, I can say that it is a good purchase. The bottom floor of the house is approximately 67sq.mt. and it warms up nicely without any additional source of heat. Some of the heat does reach the second floor but not as much as I would like it to. In any case, the windows are from 1979 and if you stand next to them you can actually feel the cold draft coming in. If you light a candle and put it next to the margins of the window, where the limit between the window and the frame is, you can see the fire move due to the draft. Hopefully, one day, when I am able to change the windows, the warmth might stay inside a bit more. Today, for example, it is -10C and the fire has been on almost all day and the inside temperature started this morning at 15C and we are now at 21C, which is pretty good.
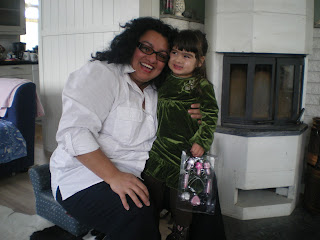
Here is Isabelle and me next to our fireplace. :)
Saturday, October 29, 2011
Drenering - The Drainage
So today I figured out it was about time to update my blog as so much has happened in Tjodheim. I blogged in May the last time I did. It took five months to get things more organized as it was just a NIGHTMARE! Though I had thought about doing the drainage last, the lack of customer service and lack of interest from local plumbers and big bathroom making companies pushed me to the hasty decision of leaving the bathroom/toilet for next year. - Despite the fact that it urgently needs refurbishing!
I like the way I can see the house during the different seasons. Here is the terrible winter and then the summer:
The summer does seem to be a little more welcoming.
Here we go, this is what the balcony and garden looked like before the drainage job:
The idea is to remove this balcony and the surrounding plants to avoid accumulation of mold during the spring, summer and fall months. But I still plan to keep my hammoc!
And this is the open area of the balcony:
During the job...
Digging out the house, this is the front facing the Southeast.
Notice the stones on which the foundations of the house rest.
Water would easily go through the stones and into the basement making it awfully wet.
oh yeah, while doing the job the digging machine broke my fiber optic cable costing me an additional 300 dollars!!!!
Next step is to wash the dirty rocks and remove any possible insects or snails. This is the corner that meets the Southeast with the Southern face of the house.
And my little one being nosy watching the whole process.
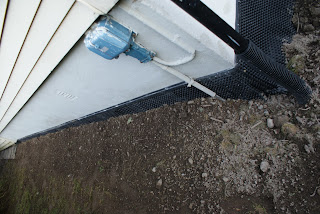
stones washed, covered with drainage plastic, pipes under the gravel of 3 different sizes, from big to small on top. Eastern face.
Northeastern face of the house where the entrance to the basement is.
Western side of the house, perhaps the one where the most moisture went through.
Just like the rest of the house, the foundations are built on piled up stones.
Southern face of the house completed.
Western face of the house after a huge rain shower. at least that water ain't going inside!
A very messy job
Southern face of the house
Western face covered, protected and done!
South meets southeast
Actually this is where the balcony was.
It was quite a shock to see the foundations of the house on a bunch of stones put together with some sort of mortar, but then the guy in charge of the job explained to me that because it is a house from 1917, it is a very old house and that is the technique they used! Anyhow, I am glad this is done and that the basement will not be as wet as it was before, thus helping the house to be warmer!
I'm waiting for the grass to grow a bit more before I can post pictures of the finished job, which turned out to be fantastic!
Subscribe to:
Comments (Atom)


